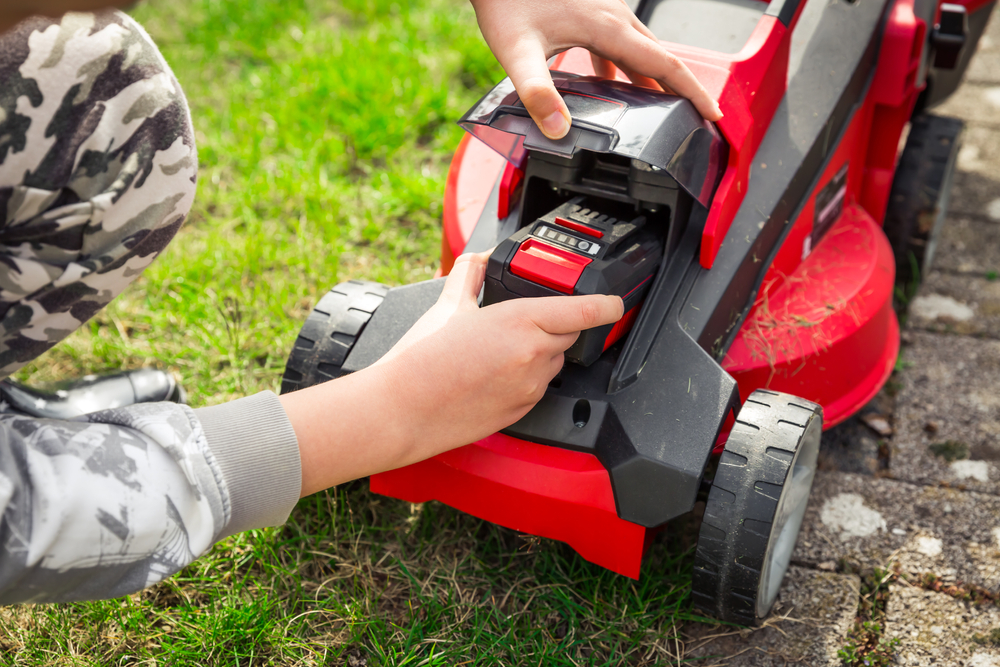
Regular oil changes are essential for keeping your residential zero-turn mower in peak condition. These machines, while compact and designed for efficiency, still rely on small engines that demand proper care. Just like a car, a zero-turn mower’s engine must remain lubricated to prevent premature wear and overheating. Without fresh oil, contaminants like dust, fuel residues, and metal shavings accumulate and increase friction, which compromises engine performance and can lead to costly repairs.
When considering a zero-turn mower maintenance schedule, the engine is your top priority. Most manufacturers recommend oil changes after the first 5 to 10 hours of use for new mowers to remove metal particles from the engine break-in period. After that, the standard guideline is to change the oil every 50 hours of operation. However, this number is not absolute. Environmental conditions, the size of your yard, mowing frequency, and the age of the engine all play a role in determining the ideal lawn mower oil change frequency.
Seasonal users might only rack up 25 to 40 hours in an entire mowing season. In such cases, an annual oil change, preferably at the start of each season, is generally sufficient. On the other hand, if you’re mowing larger areas weekly or in high-heat climates, sticking to the 50-hour rule or even shortening the interval can help improve small engine longevity.
Factors That Affect Oil Change Frequency
Oil change schedules aren’t one-size-fits-all. Several key factors can increase or decrease how often you should service your mower’s engine oil. Ambient temperature plays a huge role. Mowing in hot or dusty conditions causes oil to break down more quickly and clogs the air filter faster. This creates a scenario where the engine is working harder and needs more frequent maintenance.
The quality of oil used is another factor. Synthetic oils tend to offer better resistance to heat and viscosity breakdown, which can extend intervals between changes slightly. However, they are not immune to contamination, so timing still matters. If you’re using standard SAE 30 oil, changing it more often in extreme weather or with heavy use is a good rule of thumb.
Also consider the engine brand and model. Some newer engines have improved oil filtration systems and heat dispersion technologies that allow for longer oil change intervals. It’s always best to consult the mower’s owner manual, which includes the manufacturer’s recommended zero-turn mower maintenance schedule.
Storage practices can also affect how often you change oil. Leaving oil in the mower over a long winter can lead to moisture contamination. That’s why many experts suggest performing an oil change before putting the mower into storage or immediately after bringing it back out, depending on your storage environment.
Why Oil Quality and Cleanliness Matters
The health of your zero-turn mower’s engine is directly tied to the quality of its oil. Dirty oil thickens and loses its ability to lubricate internal parts effectively. This leads to increased wear on engine components and decreased efficiency. Clean oil keeps the piston rings, valves, and crankshaft moving smoothly, preventing friction and allowing the engine to maintain proper compression and power.
Neglecting regular oil changes significantly shortens the lifespan of the engine. It also puts additional stress on connected systems like the hydro-drive. If the mower runs too hot due to insufficient lubrication, the transmission system may overheat and wear prematurely. Keeping the oil fresh helps ensure that both the engine and hydro-drive service components function in harmony for the long term.
Oil changes also provide a good opportunity to perform quick checks on other vital systems. For example, you can inspect belts, air filters, and blades while the mower is being serviced. This proactive approach supports small engine longevity and reduces the chances of unexpected breakdowns during mowing season.
Other Critical Maintenance: Air Filters and Hydro-Drive Systems
Changing the oil is essential, but it is only one part of a complete zero-turn mower maintenance schedule. The air filter is just as crucial. A clogged or dirty air filter restricts airflow to the engine, which causes it to burn fuel inefficiently and reduces power output. More importantly, it allows dirt and debris into the combustion chamber, where they can cause internal engine damage.
Most residential zero-turn mower manuals suggest inspecting the air filter every 25 hours and replacing it every 100 hours. However, in dusty or dry environments, the filter might need to be changed more frequently. A good rule is to check the filter visually each time you change the oil. If it looks dirty or clogged, replacing it can prevent long-term engine problems.
In addition to the air filter, the hydro-drive system requires attention. Many zero-turn mowers use hydraulic transmission systems that rely on clean hydraulic oil and filters. These systems power the wheels independently, allowing the mower to turn sharply and maneuver with precision. If the hydro-drive oil becomes contaminated or low, the mower may lose traction or experience jerky movement.
While hydro-drive service intervals are typically longer (often 200 to 500 hours), it’s important to follow the manufacturer’s recommendations closely. Some systems are sealed and require little maintenance, while others need regular oil and filter changes. Keeping this system in top shape improves control and extends the life of your mower’s drivetrain.
Signs It’s Time to Change Your Mower’s Oil
Knowing when to change your mower’s oil doesn’t always require a strict hour count. There are several indicators that the oil needs attention, even if you haven’t hit the 50-hour mark. One of the most common signs is dark, thick, or sludgy oil. Clean oil has a golden or light brown color and a smooth consistency. When it turns black or gritty, it’s no longer performing effectively.
You may also notice decreased engine performance. If your mower struggles to start, runs louder than usual, or loses power under normal load, old oil could be to blame. Over time, degraded oil fails to lubricate moving parts efficiently, causing more internal friction and reduced output.
Another symptom is increased exhaust smoke or a noticeable burning smell. These are often the result of excessive heat and poor combustion due to oil degradation. If you detect any of these signs, it’s wise to check the oil immediately and replace it if necessary.
Routine inspections are your best defense. Checking the oil level and appearance every 10 to 15 hours of use ensures you can catch issues early. Pairing this with regular filter checks and occasional hydro-drive service will help keep your mower running like new for years.
Conclusion
Maintaining a healthy engine through routine oil changes is vital for getting the most out of your residential zero-turn mower. While 50-hour intervals serve as a solid baseline for lawn mower oil change frequency, factors like climate, terrain, engine type, and overall use should guide your specific maintenance routine. Sticking to a comprehensive zero-turn mower maintenance schedule that includes regular oil and air filter replacement for mowers, as well as timely hydro-drive service, ensures your machine stays reliable and efficient.
Taking a few minutes every few weeks to monitor oil condition and engine performance is a small investment that pays off in smoother operation, fewer repairs, and longer equipment life. In the world of small engines, consistency is key. By staying on top of your mower’s service needs, you’re not only protecting your investment but also making your lawn care experience smoother, faster, and more enjoyable.

When winter hits West Tennessee, residents of towns like Bells, TN know all too well the challenges that come with it. Ice storms can arrive with little warning, bringing power outages, impassable roads, and dangerous cold. Preparation is essential, especially when it comes to making sure your generator and other cold-weather equipment are ready to perform under pressure. Without proper maintenance, your outdoor power gear could fail just when you need it most. Here’s how to make sure you’re truly winter storm ready.
The Critical Role of Generators in Ice Storm Preparation
During an ice storm, one of the first things to go is often the power. Heavy ice accumulation can snap power lines and topple utility poles, plunging entire communities into darkness for hours or even days. In rural areas like Bells, TN, utility repair can take even longer due to widespread outages and treacherous road conditions.
This is where your portable generator becomes not just convenient but essential. Keeping your home warm, your fridge running, and critical appliances operational hinges on having a reliable source of backup power. However, relying on a generator that has not undergone recent portable generator maintenance is a gamble. It’s not uncommon for generators that have sat idle during warmer months to fail when suddenly called into action.
To avoid this risk, a full inspection of your generator is recommended before any major winter weather system arrives. This includes checking the fuel system, oil levels, spark plugs, filters, and running the generator under load to ensure functionality. If you’re unsure or notice issues, schedule a professional generator repair in Bells, TN to resolve any problems before the weather turns severe.
The Challenges of a Cold Weather Engine Start
Starting engines in freezing temperatures is notoriously difficult. Cold weather affects batteries, thickens oil, and increases the resistance in engine components. Whether it’s your generator, snowblower, or chainsaw, all gasoline-powered equipment will face added strain during a cold weather engine start.
One common issue is oil viscosity. If the oil in your generator or other machinery is too thick, it can make starting the engine difficult or even impossible. Switching to a winter-grade oil can help reduce this problem. Additionally, older batteries can lose up to 50% of their capacity in cold weather, making it harder to crank an engine. Testing and replacing weak batteries ahead of winter is another essential task.
Another helpful tip is to store equipment in a garage or insulated shed to keep it out of the bitter cold. If that’s not possible, using a block heater or even a heated engine blanket can significantly improve your chances of a successful cold weather engine start.
Winterizing Outdoor Power Equipment: What You Need to Know
Too many homeowners pack away lawn mowers and trimmers when fall ends and forget about the rest of their outdoor equipment. Yet properly winterizing outdoor power equipment is vital for ensuring it works when you need it and lasts for years to come.
Begin by draining fuel from any equipment that won’t be used for several months. Gasoline begins to degrade in as little as 30 days, and stale fuel can clog carburetors and fuel lines. For equipment you intend to use throughout winter, like generators or snow throwers, add fuel stabilizer to fresh gasoline and run the engine briefly to circulate the treated fuel.
Lubricating moving parts, checking belts and hoses, and cleaning off any dirt or debris also go a long way in preventing winter damage. If you’re storing any equipment outdoors, cover it with a heavy-duty tarp to protect it from ice, snow, and moisture.
Failing to winterize properly not only risks engine failure but can also void manufacturer warranties. Treat your equipment with the same care you’d give your car or HVAC system. Schedule winterizing services from trusted local professionals if you’re unsure how to do it yourself.
Generator Repair and Portable Generator Maintenance in Bells, TN
Whether your generator is a portable unit or a standby system hardwired into your home, regular service is the key to long-term reliability. Portable generator maintenance should be performed at least once a year, more often if the unit has seen heavy use. This includes changing the oil, replacing filters, cleaning spark plugs, and checking the fuel system for signs of leaks or corrosion.
If your generator is not performing as expected or refuses to start, it may be time for a generator repair. In Bells, TN, look for licensed technicians who specialize in small engine service and who are familiar with the common models used in the region. They’ll be able to test your generator under simulated load conditions and diagnose problems before they become critical.
Trying to troubleshoot or repair a generator on your own can be risky. Not only are you dealing with gasoline and electrical systems, but a mistake could lead to carbon monoxide leaks, fire hazards, or further equipment damage. For peace of mind and safety, rely on qualified professionals to handle any major repairs or inspections.
Ice Storm Preparation Beyond the Basics
Being winter storm ready means thinking beyond just power generation. Ice storms can immobilize entire areas, so preparing your property and supplies ahead of time can save you from major disruption.
Trim back any trees or limbs that overhang your home or power lines. Ice accumulation can cause branches to snap unexpectedly, damaging roofs, vehicles, or utility connections. Stock up on ice melt, sand, and snow removal tools before local supplies run out. Also, make sure your cold-weather gear, such as snow boots, insulated gloves, and thermal outerwear, is in good condition.
Make an emergency kit that includes flashlights, fresh batteries, bottled water, shelf-stable food, medications, and a backup phone charger. And, of course, keep enough fuel on hand for your generator, ideally stored safely in approved containers in a well-ventilated area.
If you have pets or livestock, make plans for their shelter and food supply as well. In towns like Bells, TN where agriculture is still a part of life, protecting animals during a freeze is a top priority.
Conclusion
Ice storms in West Tennessee are more than just inconvenient; they can be dangerous and even life-threatening without proper preparation. Your generator and outdoor power equipment are your first line of defense when the grid goes down and the temperature drops. By investing time in generator repair, winterizing outdoor power equipment, and understanding the unique challenges of a cold weather engine start, you give yourself and your family a much greater chance of staying safe and comfortable during winter weather events.
Portable generator maintenance is not something to put off until the first flakes fall. Taking action early, especially in towns like Bells, TN, where winters can be unpredictable, is the best strategy. When the next ice storm comes barreling through, you’ll be glad you were ready.
Winter landscapes may look serene, but for professional loggers and arborists, they present a unique set of technical and physical challenges. From the sub-zero temperatures affecting equipment to the increased risks of slips, breaks, and mechanical failure, winter demands a specific maintenance mindset. Those working in forestry or arboriculture during the colder months know that preparation is not a luxury. It’s a necessity for both productivity and safety.
Proper winterization routines can extend the life of your tools, prevent on-the-job accidents, and ensure maximum efficiency in harsh environments. Whether you’re running chainsaws from top-tier brands like Husqvarna or Stihl or scaling icy tree trunks with a full load of climbing gear, having a solid winter maintenance plan is critical. This guide offers insights and actions that logging and tree care professionals can take to keep their gear and themselves in optimal condition during the toughest time of the year.
Engine Efficiency in the Cold: Fine-Tuning Power Equipment
One of the first steps in cold-weather preparation is ensuring that your power tools are set to handle winter conditions. Many loggers and arborists rely heavily on high-performance brands like Husqvarna and Stihl, both of which include specific winter settings to optimize performance when temperatures drop.
For example, chainsaws may come with a winter shutter or pre-heater setting that redirects warm air from the engine to the carburetor. This prevents carburetor icing and ensures smoother startup and operation. Adjusting these settings should be a part of any regular cold weather inspection to keep your machines in peak form. Neglecting this step can result in hard starts, poor performance, or even long-term engine damage.
Fuel choice also becomes increasingly important in cold weather. Ethanol-blended fuels can attract moisture, leading to fuel line freezing or internal corrosion. Opting for fresh, ethanol-free fuel where possible can reduce this risk. It is also wise to add a fuel stabilizer to maintain fuel integrity over longer idle periods, which are more common in winter.
Cold Weather Hydraulic Maintenance: Keeping Systems Responsive
Professional logging equipment service extends beyond chainsaws. For those operating skidders, harvesters, or other hydraulic-powered machinery, winter introduces specific challenges to hydraulic system performance. Cold temperatures increase the viscosity of hydraulic oil, which can lead to slower response times and increased wear on pumps and valves.
Before winter begins, swap out summer-grade fluids for those formulated specifically for low temperatures. These cold-weather hydraulic fluids maintain flow characteristics even in freezing conditions, which helps maintain system efficiency and minimizes the risk of internal damage.
It’s also important to inspect hoses and fittings thoroughly. Rubber becomes brittle in cold conditions, making it more prone to cracking or bursting under pressure. Regular checks for leaks, bulges, or stiffness in the lines can catch early signs of wear before they become catastrophic failures. Remember, hydraulic failure in the field can stall operations for hours or even days, leading to missed deadlines and reduced revenue.
Arborist Gear Inspection: Stay Secure, Stay Safe
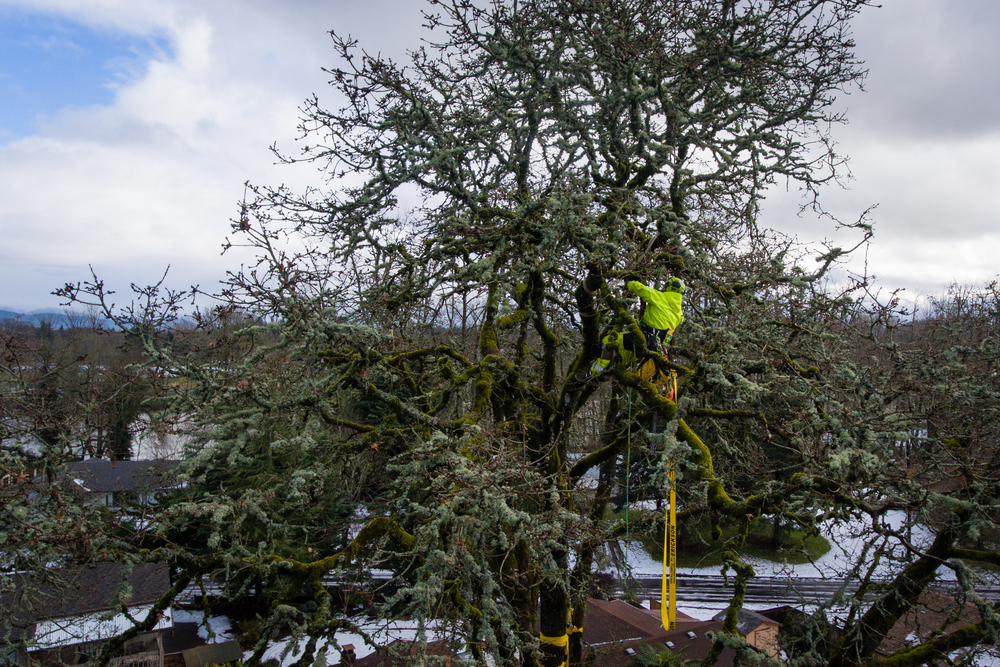
Tree climbing in winter is significantly riskier than during other seasons. Ice, snow, and freezing rain can compromise grip, visibility, and gear performance. This makes arborist gear inspection a crucial task before every job.
Ropes must be thoroughly examined for stiffness or signs of moisture damage. Even if synthetic ropes are designed to withstand cold, frozen moisture can reduce flexibility and friction control, increasing the chances of slippage during climbs or descents. If any rope appears frayed, discolored, or rigid, it should be retired immediately.
Carabiners, ascenders, and other metal components can also be affected by freezing temperatures. Lubrication points may seize, or internal springs may become sluggish. Applying cold-rated lubricants and testing all moving parts before use is essential. Additionally, store gear in temperature-controlled areas to prevent ice accumulation, especially on life-support components.
Harnesses and padding should be checked for cracking or excessive stiffness, particularly if they have been stored in a truck or trailer overnight. Always allow gear to acclimate to outdoor temperatures before use to avoid sudden material failure.
Climbing Gear Safety in Ice and Snow
Climbing in winter brings with it the very real danger of icy bark, hidden weaknesses in frozen branches, and reduced dexterity due to thick gloves. Climbing gear safety during this season isn’t just about equipment. It is also about how you interact with your gear in the environment.
Use gloves that offer both insulation and flexibility, allowing for proper grip on ropes and tools. Layering clothing in a way that doesn’t restrict movement while still offering wind and water resistance is critical. Take extra care when choosing tie-in points, as deadwood or frozen limbs may not support your weight the same way they would in warmer months.
Footwear traction is another key consideration. Crampons or spiked climbing boots can provide better grip when ascending icy trees or working on frozen ground. If your work takes you to coniferous trees laden with snow, be aware of snow dumps from above and plan your movements accordingly.
Remember, muscle fatigue sets in faster in the cold, especially if your movements are restricted by heavy clothing or if you’re expending extra energy to maintain balance on slippery surfaces. Take frequent short breaks, warm your hands regularly, and remain vigilant throughout the climb.
Professional Logging Equipment Service: A Seasonal Checklist
To keep operations running smoothly through winter, a proactive approach to maintenance is crucial. A professional logging equipment service should include more than just fixing what’s broken. It must be rooted in prevention and adaptation.
Check air filters frequently, as snow and moisture can clog them more quickly than dust during dry months. Inspect spark plugs and ignition systems for signs of corrosion. Test electric starts and battery levels routinely, especially on machines stored outdoors, as batteries can lose charge faster in cold conditions.
If you’re not already maintaining a service log for each piece of equipment, winter is the perfect time to start. Track oil changes, filter replacements, inspections, and any issues that arise during use. This record will help you identify patterns, improve scheduling of preventative service, and make better decisions about when to repair or replace aging gear.
Storing equipment properly is equally important. Heated storage is ideal, but even unheated sheds are better than leaving machines exposed to the elements. Always clean off snow and ice before storing equipment to prevent moisture damage, and use covers when possible.
Conclusion
Winter introduces a series of harsh variables for those working in logging and arboriculture. From icy climbs to sluggish engines, every aspect of the job becomes more complex and demanding. However, with thoughtful preparation, attention to detail, and consistent maintenance, professionals can continue their work safely and effectively.
By tuning your machines to cold-weather specifications such as the Husqvarna or Stihl winter settings, managing hydraulic systems properly, conducting thorough arborist gear inspections, and reinforcing climbing gear safety protocols, you set yourself up for success. Integrating these practices into your routine ensures that your equipment lasts longer, your operations remain productive, and most importantly, your team stays safe on the job.
There is no substitute for diligence when working in the cold. Professional loggers and arborists know that a well-maintained tool is more than just a convenience in winter; it is a lifeline.
When most people think about tree work in Bells, Tennessee, they picture spring and summer activity. But for professional arborists and tree service companies serving Crockett County, winter is actually one of the busiest and most critical seasons of the year. With dormant trees, ideal working conditions, and the constant threat of ice storms in West Tennessee, having properly serviced arborist equipment isn’t just important—it’s essential for business survival.
At Hills Repair, we’ve spent years working with tree service professionals throughout the Bells area, from Highway 79 up to Alamo and down to Jackson along State Route 88. We understand the unique challenges that West Tennessee’s winter weather presents to your logging and arborist equipment, and we know exactly what it takes to keep your tools running reliably when you need them most.
Why Winter Is Prime Tree Work Season in Bells, TN
Unlike lawn care, which goes dormant in winter, tree work in Crockett County actually intensifies during the colder months. Professional arborists and logging companies know that winter offers several distinct advantages that make it the preferred season for major tree projects.
Dormant Season Benefits
The trees throughout Bells and the surrounding area—from the massive oaks on Main Street to the sweetgums lining residential properties—enter dormancy during winter. This makes it the ideal time for pruning, removal, and logging operations. When trees are dormant, they experience less stress from cutting, heal more efficiently come spring, and are less susceptible to disease transmission through pruning wounds.
For the tree service companies working in neighborhoods throughout our small city, this means steady work throughout the winter months. Whether you’re maintaining the mature hickories that shade older homes or removing damaged trees from the PictSweet Farms area, winter dormancy provides the perfect window for these operations.
Better Ground Access
West Tennessee’s winter weather, while occasionally challenging, typically provides better ground conditions than our notoriously wet springs. The frozen or firm ground makes it easier to access wooded properties without causing soil compaction or landscape damage. For logging operations in the rural areas surrounding Bells, this firm ground access is absolutely critical for getting heavy equipment to remote timber stands.
Increased Visibility and Safety
With leaves off the trees, arborists have clear visibility of the entire tree structure. This makes it easier to identify hazardous branches, assess tree health, and plan safe removal strategies. This visibility advantage is particularly important when working on the large oak-hickory specimens that dominate Crockett County’s landscape.
The Ice Storm Reality in Crockett County
If there’s one weather event that keeps tree service companies in West Tennessee on high alert, it’s ice storms. Crockett County has experienced its share of devastating ice storms, including the February 2022 storm that resulted in a federal disaster declaration and left 600 residents without power right here in Bells.
Ice Storm Damage Patterns
The 2022 ice storm brought accumulations between 0.25 to 0.75 inches across West Tennessee, with some areas receiving even more. When ice accumulates on tree branches and power lines, the weight becomes enormous. A single ice-covered tree branch can weigh hundreds of pounds more than normal, causing catastrophic failures throughout the canopy.
The tree species common to our area each respond differently to ice loading. The oak-hickory forests that dominate the region generally fare better than some species, but even these sturdy trees can suffer major limb failures under heavy ice. Sweetgums, red maples, and the abundant hackberry trees throughout Bells are particularly vulnerable to ice damage due to their branch structure and wood properties.
Emergency Response Requirements
When an ice storm hits Crockett County, tree service companies shift into emergency mode. Downed trees blocking Highway 79 and Highway 70A, branches on power lines cutting electricity to neighborhoods, and hazardous trees threatening homes all require immediate response. During these emergencies, equipment failure simply isn’t an option.
We’ve seen firsthand what happens when a chainsaw won’t start during an ice storm emergency, or when a chipper fails in the middle of clearing a major tree from someone’s roof. The financial cost is significant, but more importantly, it delays critical services that people desperately need.
Common Tree Species in Bells and Equipment Requirements
Understanding the specific trees you’ll be working with helps inform the equipment maintenance needed. The Bells area features a diverse mix of native Tennessee species, each with its own characteristics that affect your tools and equipment.
Oak-Hickory Dominance
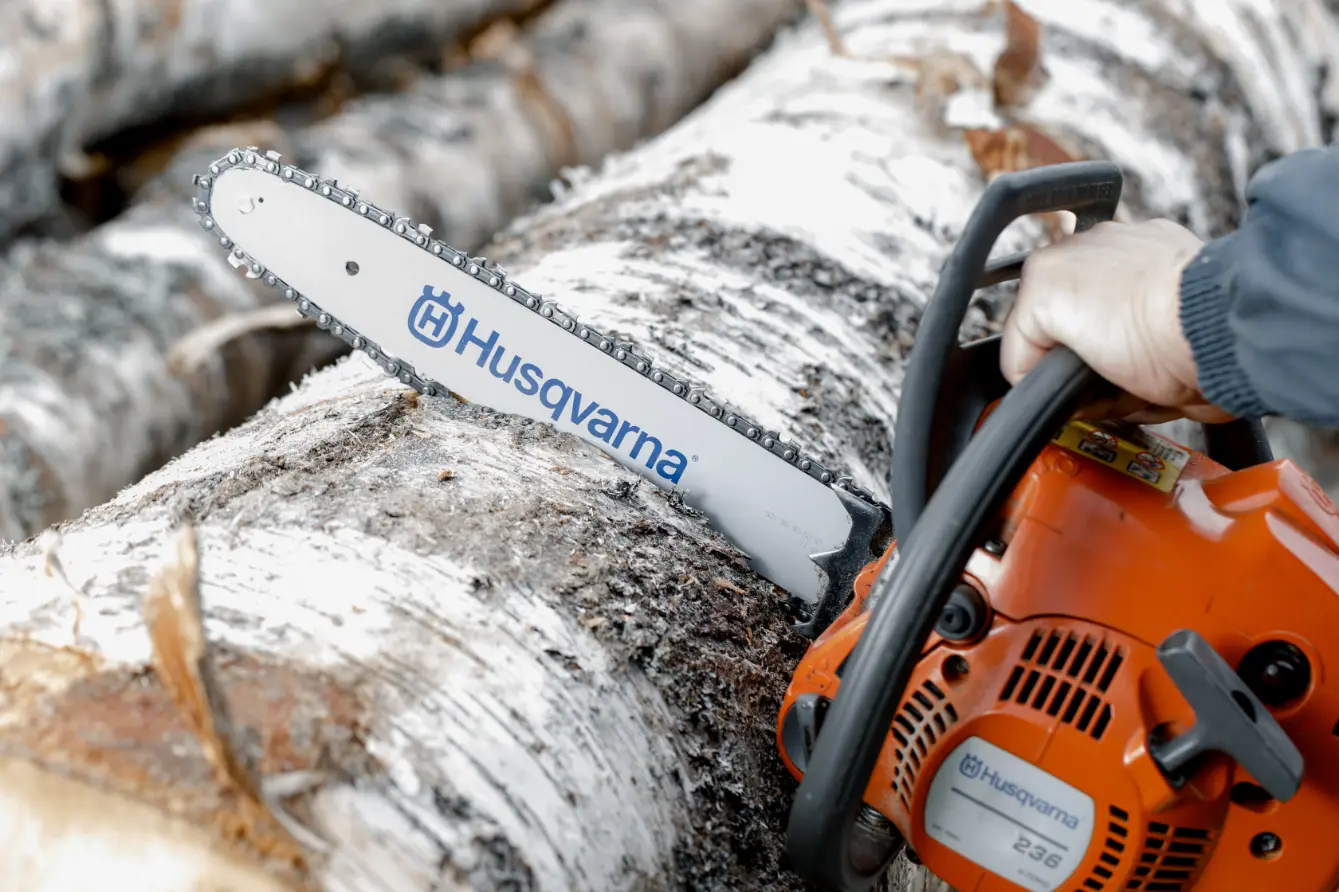
The most common forest type in our region is oak-hickory, which includes various species of both oak and hickory trees. These hardwoods are incredibly dense and tough on equipment. Whether you’re working with white oaks with their rounded leaf edges or red oaks with pointed leaves, you’re dealing with wood that dulls chains quickly and demands powerful, well-maintained equipment.
Hickory is even harder than oak and requires exceptionally sharp chains and properly tuned equipment. A chainsaw that’s running even slightly lean or with a dull chain will bog down in hickory, costing you time and potentially damaging your equipment.
Sweetgum and Maple
Sweetgums and various maple species (including red maple, silver maple, and sugar maple) are abundant throughout residential areas in Bells. While not as hard as oak and hickory, these trees present their own challenges. Sweetgums, in particular, have that distinctive star-shaped leaf and spiky seed balls, but it’s their tendency to develop included bark and weak branch unions that creates hazards during ice storms.
Red maples are prolific throughout West Tennessee and are the source of much of the beautiful fall color we enjoy. However, their wood properties and growth habits make them prone to storm damage, keeping tree service companies busy during and after winter weather events.
Bottomland Species
In the lower-lying areas near creeks and drainage ways around Bells, you’ll encounter bottomland species adapted to periodic flooding. These include water tupelo in the wettest areas and various flood-tolerant oaks in periodically flooded zones. Working in these environments requires equipment that can handle both the dense hardwoods and the challenging access conditions.
Critical Equipment Maintenance for West Tennessee Winters
With all this winter tree work ahead, let’s talk about the specific maintenance your arborist and logging equipment needs right now to perform reliably through the season.
Chainsaw Winterization and Service
Your chainsaws are the backbone of any tree service operation, and winter in West Tennessee presents specific challenges for these essential tools.
Cold-Weather Starting Issues
The single biggest complaint we hear at Hills Repair during winter is chainsaws that are hard to start or won’t start at all in cold weather. This isn’t just frustrating—it’s a business killer. When you’ve got a crew on site and equipment that won’t start, you’re burning labor hours and losing money.
Cold weather affects several systems in your chainsaw. The fuel can gel, especially if you’re not using winter-grade two-stroke mix. The carburetor may need adjustment for cold-weather operation, as the denser cold air changes the fuel-to-air ratio. And old spark plugs that were marginally acceptable in summer often fail completely when temperatures drop.
We recommend a complete cold-weather service for all chainsaws before the season hits hard. This includes carburetor cleaning and adjustment, spark plug replacement, fuel system inspection, and testing under cold-start conditions. It’s far better to identify and fix these issues in our heated shop than to discover them on a freezing morning at a job site.
Bar and Chain Maintenance
Working in wet, cold conditions accelerates wear on bars and chains. Ice and frozen wood create additional friction and stress. We see a lot of operators who try to extend chain life too long, but a dull chain in dense frozen oak costs you far more in wasted time and equipment strain than a new chain.
Winter chain maintenance should include more frequent sharpening, careful inspection of drive links for wear, and regular bar groove cleaning. The bar oil also becomes more critical in cold weather—make sure you’re using a winter-grade bar oil that flows properly at low temperatures, not a summer oil that becomes too thick.
Air Filtration in Winter Conditions
Many operators don’t realize that winter conditions can be just as hard on air filters as dusty summer work. Ice chips, frozen sawdust, and moisture can all compromise filtration. Regular filter inspection and cleaning prevents the lean running conditions that can damage your engine.
Chipper Maintenance
If chainsaws are your workhorse, chippers are your production multiplier. A broken-down chipper can bring an entire operation to a halt, turning what should be a profitable day into an expensive problem.
Hydraulic System Concerns
Cold weather is brutal on hydraulic systems. The hydraulic fluid becomes more viscous, putting extra strain on pumps and making the feed system sluggish. Before winter work begins, hydraulic systems need complete inspection. This includes checking fluid levels, looking for leaks, inspecting hoses for cracks or damage, and ensuring the fluid is appropriate for cold-weather operation.
Some operators try to save money by running the same hydraulic fluid year-round, but this is penny-wise and pound-foolish. Multi-viscosity hydraulic fluids designed for cold weather maintain proper flow characteristics and protect your system, preventing expensive repairs down the road.
Feed System Reliability
The feed system is where debris enters your chipper, making it particularly vulnerable to problems. Worn feed wheels, damaged rollers, or misadjusted controls can cause jams and shutdowns. During winter when you might be processing ice-coated branches or frozen wood, these issues become even more critical.
A pre-season inspection should include feed wheel condition, roller alignment, control cable operation, and safety system functionality. The reversing mechanism must work flawlessly, as jammed frozen wood poses safety risks in addition to operational problems.
Blade Sharpness and Condition
Dull chipper blades don’t just reduce efficiency—they create dangerous situations. Rather than cleanly cutting material, dull blades tear and grab, causing jams and potentially violent ejection of material. The hard, dense hardwoods common around Bells dull blades faster than softer woods, so blade service becomes even more important for our area.
We recommend blade inspection and sharpening as part of your pre-winter service, with additional sharpening scheduled based on your usage patterns. For high-volume operations, having a spare set of sharp blades ready to swap can minimize downtime.
Stump Grinder Service
For tree removal operations, stump grinding is often the final step, and these machines take incredible abuse. The grinding wheel rotates at high speeds while the carbide teeth tear through wood, and any mechanical issue can sideline your machine.
Cutting Tooth Inspection
The carbide cutting teeth are your stump grinder’s business end. Worn, broken, or missing teeth drastically reduce grinding efficiency and can damage the wheel. Before winter work begins, carefully inspect every tooth. Replace any that are worn beyond specifications, and make sure you have adequate spare teeth on hand.
Winter grinding presents unique challenges. Frozen ground around stumps is harder on teeth. The stumps themselves may be frozen, creating additional resistance. And cold weather makes carbide more brittle, increasing the risk of tooth breakage on hidden rocks or obstacles.
**Hydraulic and Drive System
**
Like chippers, stump grinders rely heavily on hydraulic systems for operation. The hydraulic motors that drive the cutting wheel and the hydraulic cylinders that control wheel position must function reliably. Cold weather compounds any marginal issues in these systems.
We perform complete hydraulic system evaluation on stump grinders, including pressure testing, leak detection, and component inspection. The drive belt or chain also needs careful inspection, as any failure here stops production completely.
Aerial Lift and Bucket Truck Maintenance
For tree service companies with aerial equipment, these machines represent major investments that need proper care to deliver reliable service.
Cold-Weather Fluid Concerns
Aerial lifts have multiple fluid systems that need attention before winter. Engine oil, hydraulic fluid, and even diesel fuel in the tank can all be affected by cold temperatures. Using winter-grade fluids throughout the machine prevents cold-weather starting problems and ensures proper operation.
Diesel fuel is particularly critical in West Tennessee winters. Even though our cold snaps aren’t as severe as up north, temperatures can drop low enough for fuel gelling to occur. Adding anti-gel treatments and using winter-blend diesel prevents costly fuel system problems.
Electrical System Reliability
Cold weather is hard on batteries, and bucket trucks often sit idle between jobs, allowing batteries to drain. A dead battery when you arrive at a job site wastes time and projects an unprofessional image. Battery testing and replacement if needed should be part of your pre-winter service.
Additionally, all safety lights, emergency flashers, and work lights need inspection. Winter brings shorter days, meaning more work occurs in low-light conditions. Non-functioning lights create safety hazards and can result in citations if you’re working near roadways.
Safety System Verification
Aerial lifts have numerous safety systems that must function properly: outrigger sensors, load limiters, emergency descent systems, and more. Winter is the wrong time to discover that a critical safety system has failed. Complete safety system testing should be performed annually, and before winter is the perfect time for this inspection.
Preventive Maintenance: The Smart Business Decision
We’ve worked with tree service companies throughout Crockett County for years, and we’ve seen the stark difference between operations that prioritize preventive maintenance and those that run equipment until it breaks.
The True Cost of Downtime
When a piece of equipment fails on a job site, the costs add up quickly. You have a crew standing around being paid hourly. You might have already committed to a customer with a specific completion timeline. And you’re almost certainly losing the opportunity to take on additional work while dealing with the breakdown.
For emergency storm work following an ice storm, the costs are even higher. Storm damage creates surge pricing opportunities—when everyone needs tree service, rates naturally increase. But you can only capitalize on this if your equipment is running. A chainsaw that won’t start or a chipper that breaks down means watching profitable work go to competitors with properly maintained equipment.
Scheduled Service vs. Emergency Repairs
Scheduled maintenance is almost always less expensive than emergency repairs. When you bring equipment to Hills Repair for planned service, we can work efficiently and source parts at regular prices. Emergency repairs, by contrast, often require expedited parts shipping and overtime labor, dramatically increasing costs.
More importantly, scheduled maintenance lets you plan around business needs. You can schedule service during slower periods or coordinate timing across your fleet to minimize operational impact. Emergency breakdowns, by contrast, happen at the worst possible times—usually when you’re busiest and can least afford the downtime.
Building Reliability Into Your Operation
Professional tree service companies stand out from weekend warriors through reliability. When you tell a customer you’ll be there Monday morning to remove a storm-damaged tree, you need confidence that your equipment will perform. Preventive maintenance builds that reliability into your operation.
This reliability extends to your reputation in the community. Bells is a small city where word travels fast. Tree service companies known for showing up on time with properly functioning equipment earn repeat business and referrals. Those known for equipment problems and delays struggle to build and maintain a customer base.
Hills Repair’s Comprehensive Service Approach
At Hills Repair, we’ve built our reputation on understanding the specific needs of logging and arborist equipment operators in West Tennessee. We’re not a general small engine shop that occasionally works on tree equipment—professional tree service equipment is a core part of our business.
Expert Technicians Who Understand the Work
Our technicians have real-world experience with the demands of tree work. We understand how a chainsaw performs differently when cutting frozen oak versus fresh pine. We know the stress that ice-coated limbs put on chipper feed systems. And we appreciate that when you bring us a machine for service, your business is depending on us to do the job right.
This experience translates to better service. We know where to look for common failure points. We understand which parts are worth rebuilding and which should simply be replaced. And we can often spot developing problems before they cause breakdowns, saving you from future headaches.
Genuine Parts and Quality Repairs
We source genuine OEM parts for all major brands of professional equipment. While aftermarket parts might seem like a cost savings, the false economy of cheap parts becomes apparent when they fail prematurely. Professional tree service equipment operates under demanding conditions—it needs professional-grade parts to perform reliably.
Our parts inventory includes common wear items for popular equipment brands, meaning we can often complete repairs quickly without waiting for parts to arrive. For less common items, we have established relationships with distributors throughout the region, ensuring quick access to what we need.
Convenient Service Options
We understand that getting equipment to and from our shop can be challenging, particularly for larger machines like chippers and stump grinders. We offer flexible service options including on-site evaluation for some equipment and coordinated service scheduling to minimize your downtime.
Located right here in Bells, we’re conveniently accessible for tree service companies throughout Crockett County and neighboring areas. Whether you’re based in Bells, serving customers in Alamo to the northwest, or working jobs down in Jackson, our location makes it easy to drop off and pick up equipment without extensive travel time.
Preparing for Winter Storm Season
Beyond regular equipment maintenance, preparing for potential ice storm work requires additional planning and preparation.
Emergency Readiness Equipment Checks
Storm work is different from routine tree service. You need equipment that will start and run reliably under the worst conditions. This means extra attention to cold-weather starting, fuel quality, and backup equipment availability.
We recommend having at least one backup chainsaw for every two primary saws in your operation. When storm work hits and you’re running long hours, equipment failures are more likely. Having immediately available backups keeps your crew productive and maximizes your ability to capitalize on storm work opportunities.
Safety Equipment and Lighting
Winter storms often leave power out, meaning you’ll be working in darker conditions than normal. Quality work lights, both portable and vehicle-mounted, become essential equipment. This isn’t just about productivity—it’s about crew safety. Tree work is inherently dangerous, and darkness multiplies those risks.
Personal protective equipment also needs attention. In cold conditions, crews need proper cold-weather gear that still allows for safe operation of equipment. Gloves, for instance, must provide warmth without reducing grip or dexterity to dangerous levels.
Communication and Coordination
Ice storms create chaotic conditions with multiple simultaneous emergencies. Having reliable communication equipment—whether cell phones with backup power sources or two-way radios—ensures your crew can stay coordinated and respond to changing priorities.
The Bottom Line: Invest in Reliability
As we move deeper into winter, tree service work throughout the Bells area will intensify. Dormant season pruning, land clearing projects, and inevitable storm damage response all create opportunities for well-equipped professional operators.
The difference between capitalizing on these opportunities and losing work to competitors often comes down to equipment reliability. Properly maintained chainsaws start on the first pull. Well-serviced chippers process material efficiently without frustrating jams and breakdowns. And maintained aerial equipment operates safely and reliably job after job.
At Hills Repair, we’re here to help tree service professionals throughout Crockett County maintain that reliability. From routine maintenance to major repairs, we have the expertise, parts, and commitment to keeping your operation running.
Don’t wait for equipment problems to sideline your operation during the busy winter season. Contact Hills Repair today to schedule service for your logging and arborist equipment. Whether you need a simple tune-up or comprehensive service across your equipment fleet, we’re ready to help ensure you’re prepared for whatever West Tennessee’s winter throws at you.
Winter tree work in Bells, TN demands reliable equipment. Make sure yours is ready by scheduling service now, before the next ice storm hits or the next big pruning job calls. Your equipment, your crew, and your customers all depend on it.