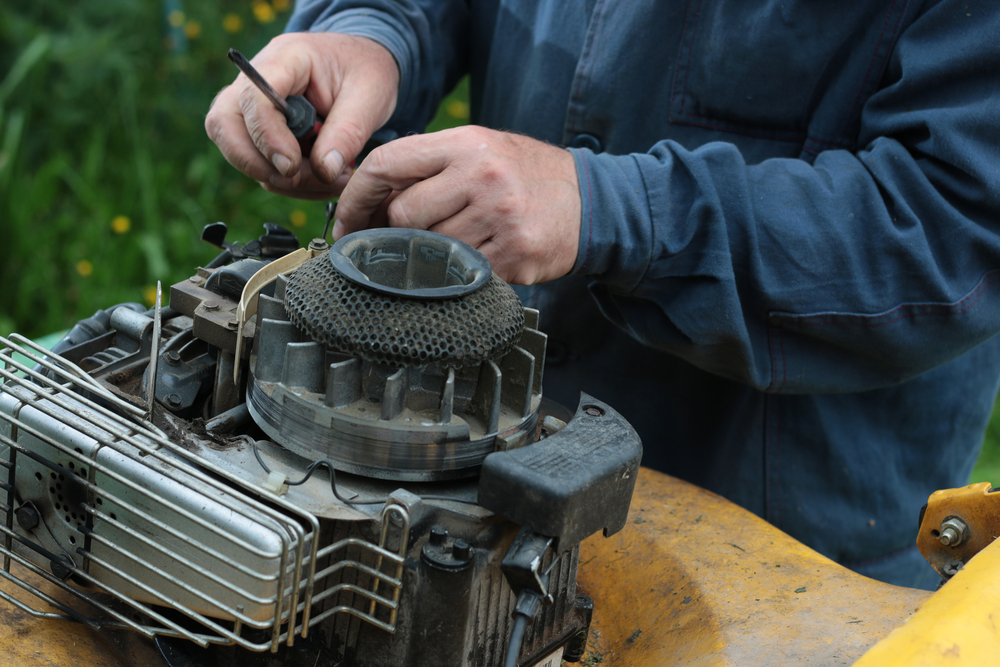
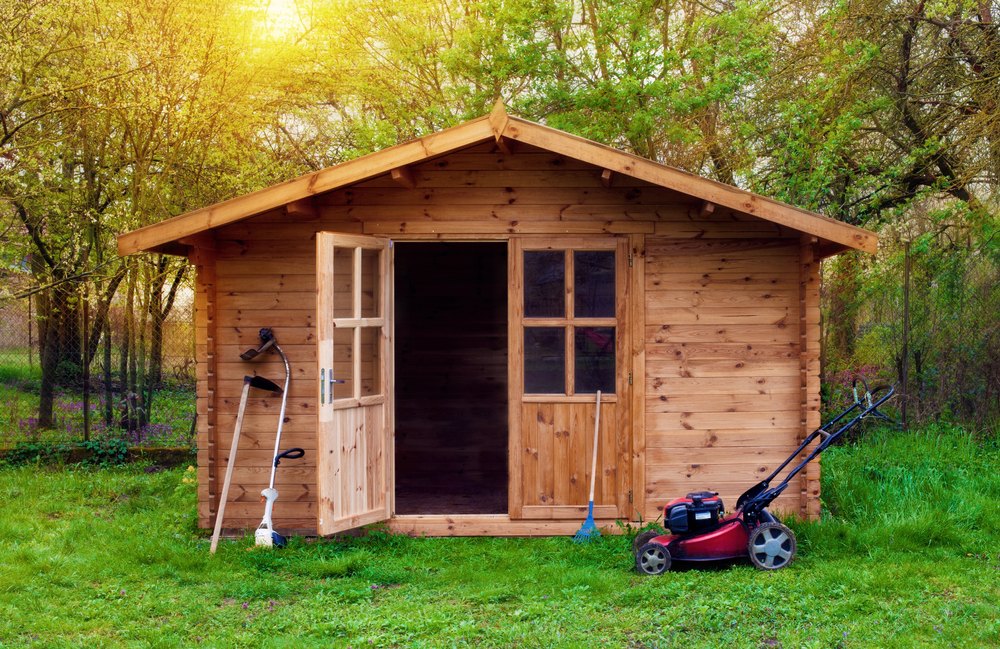
Summer in West Tennessee puts your lawn mower through some of its toughest working conditions. Long stretches of hot weather, thick grass growth, and dusty mowing conditions can take a toll on even a well-maintained machine. If your mower has been working hard since spring, mid-summer is the perfect time to give it the attention it needs before minor issues turn into costly repairs.
Quick Answer
A mid-summer lawn mower tune-up helps your equipment perform better during the hottest part of the mowing season. Cleaning the mower, changing the oil, replacing the air filter, sharpening the blade, checking the spark plug, and inspecting belts and tires can improve reliability, fuel efficiency, and cutting performance while helping prevent unexpected breakdowns.
What Local Readers Should Know
West Tennessee’s combination of heat, humidity, and fast-growing grass places extra stress on lawn mower engines during July and August.
Dusty conditions throughout Madison County and surrounding rural areas can clog air filters faster than many owners expect.
A dull mower blade tears grass instead of cutting it cleanly, which can leave lawns looking brown even after watering.
Regular tune-ups often catch worn belts, damaged blades, or leaking fuel lines before they become larger repair issues.
Mid-season maintenance can help your mower finish the rest of the growing season with fewer interruptions.
Why This Matters Locally
A mid-summer mower tune-up matters because West Tennessee lawns rarely get a break during the growing season. Warm temperatures, afternoon thunderstorms, and extended periods of humidity keep grass growing well into late summer. Whether you’re maintaining a residential yard in Jackson, caring for acreage outside Medina, or mowing commercial properties near Humboldt, equipment that skips routine maintenance often works harder than necessary.
At Hill’s Repair Shop, we know that dependable lawn equipment helps homeowners and property owners stay ahead of the season. We focus on keeping equipment running efficiently so our customers can spend less time dealing with breakdowns and more time enjoying a well-maintained property.
Local Field Observations
Professional field observations show that many mower repairs during late summer begin with maintenance items that could have been addressed earlier. Engines often arrive with clogged cooling fins, dirty air filters, worn spark plugs, or blades that have not been sharpened since spring. Hot weather simply makes existing problems more noticeable because engines operate under greater stress.
How West Tennessee Conditions Affect Your Lawn Mower
West Tennessee’s climate creates several challenges for outdoor power equipment.
High temperatures cause engines to run hotter.
Humidity increases engine workload while encouraging thick grass growth.
Frequent mowing means blades dull more quickly.
Dust from gravel driveways and rural roads clogs filters faster.
Occasional summer storms leave heavy, wet grass that demands more power from the engine.
These conditions make regular maintenance especially valuable throughout Madison County and nearby communities.
Mid-Summer Lawn Mower Tune-Up Checklist
A complete mid-season tune-up includes several simple inspections that help keep your mower operating efficiently.
Change the Engine Oil
Fresh oil reduces engine wear and helps carry heat away from moving parts. Dirty oil loses its protective qualities and can shorten engine life.
Clean or Replace the Air Filter
A clogged air filter restricts airflow, reducing power and increasing fuel consumption. Check the filter regularly during dusty summer conditions.
Inspect the Spark Plug
Replace a worn or fouled spark plug if needed. A healthy spark plug improves starting and promotes smoother engine performance.
Sharpen the Blade
A sharp blade cuts grass cleanly instead of tearing it. Clean cuts help lawns recover faster during hot weather.
Clean the Underside of the Deck
Grass buildup reduces airflow beneath the deck and can affect cutting quality. Removing debris also helps reduce corrosion.
Check Tire Pressure
Uneven tire pressure can create an uneven cut and make the mower harder to control.
Inspect Belts and Cables
Look for cracking, fraying, or excessive wear. Catching worn belts early may help avoid unexpected downtime.
Check Fuel Quality
Old gasoline can cause poor performance. If fuel has been sitting for an extended period, consider replacing it with fresh fuel according to the manufacturer’s recommendations.
Warning Signs Your Lawn Mower Needs Service
Your mower may need professional attention if you notice any of these problems.
Hard starting or repeated stalling
Excessive vibration while mowing
Uneven or ragged grass after cutting
Smoke from the engine
Loss of power in thick grass
Fuel leaks or unusual odors
Squealing belts or unusual noises
Difficulty engaging the blades
Ignoring these symptoms may allow relatively small issues to become more expensive repairs.
When to Call a Professional
Basic maintenance such as cleaning debris, checking tire pressure, or replacing an air filter is manageable for many homeowners.
Professional service becomes worthwhile when you notice engine performance issues, excessive vibration, fuel system problems, transmission concerns, electrical issues, or blade spindle damage. Proper diagnosis often prevents unnecessary parts replacement and helps identify problems before they become more severe.
Common Causes of Mid-Season Lawn Mower Problems
Several conditions commonly contribute to mower issues throughout West Tennessee.
1. Heat Stress
Long mowing sessions during high temperatures place additional stress on engines and cooling systems.
2. Dirty Air Filters
Dust and grass particles quickly accumulate during summer mowing.
3. Dull Blades
Repeated contact with sticks, rocks, and dry soil gradually reduces cutting performance.
4. Lack of Lubrication
Old oil increases engine friction and operating temperatures.
5. Deferred Maintenance
Skipping seasonal inspections allows minor wear to progress into larger repairs.
Prevention and Maintenance Tips
Preventive maintenance helps extend mower life while reducing unexpected repairs.
Clean the mower after each use.
Check engine oil regularly.
Replace worn filters according to the manufacturer’s recommendations.
Sharpen blades several times during the mowing season.
Avoid mowing during the hottest part of the day when possible.
Remove grass buildup beneath the deck frequently.
Store fuel properly and avoid using stale gasoline.
Schedule professional service if performance changes noticeably.
What Results Can You Expect?
A properly tuned mower typically starts more easily, cuts more evenly, runs more efficiently, and experiences fewer interruptions throughout the remainder of the mowing season. While no maintenance eliminates every possible repair, routine service helps keep equipment operating closer to its intended performance.
Common Mistakes Homeowners Make
Mistake: Waiting until the mower stops running before scheduling service.
Consequence: Small maintenance needs become larger repair bills.
Better Approach: Perform routine inspections throughout the mowing season.
Mistake: Continuing to mow with a dull blade.
Consequence: Torn grass becomes more vulnerable to heat stress and disease.
Better Approach: Sharpen or replace blades as needed.
Mistake: Ignoring unusual engine sounds.
Consequence: Minor mechanical issues may worsen over time.
Better Approach: Have unusual noises inspected before additional damage occurs.
A Common Local Scenario
A homeowner finishes mowing every week without noticing that the mower gradually becomes harder to start and begins leaving uneven stripes across the lawn. By late summer, a clogged air filter, dull blade, and worn spark plug combine to reduce performance significantly. A routine tune-up restores normal operation and helps avoid additional engine strain during the hottest weeks of the season.
We proudly serve customers throughout West Tennessee, including Jackson, Medina, Humboldt, Milan, Three Way, and surrounding communities throughout Madison County and nearby areas.
The Cost of Ignoring Mid-Season Maintenance
Skipping routine maintenance can lead to increased fuel consumption, uneven cutting, unnecessary engine wear, and unexpected equipment downtime during the busiest part of the mowing season. Addressing small maintenance items early often helps avoid larger repairs later.
How often should I tune up my lawn mower in West Tennessee?
A mid-summer tune-up is recommended if your mower has been used heavily since spring. West Tennessee’s long growing season often justifies additional maintenance beyond annual service.
Why does my mower struggle in thick Jackson lawns?
Heavy summer grass places additional demands on the engine. Dirty filters, dull blades, or worn spark plugs can reduce performance during demanding mowing conditions.
Can a dull mower blade damage my lawn?
Yes. A dull blade tears grass instead of cutting it cleanly, which can leave brown tips and place additional stress on the lawn during hot weather.
Is changing the air filter really necessary?
Yes. A clean air filter allows the engine to receive proper airflow, improving efficiency and reducing unnecessary engine strain.
What should I do if my mower vibrates excessively?
Stop using the mower and inspect the blade for damage. Persistent vibration should be professionally diagnosed to prevent further mechanical damage.
Does hot weather affect lawn mower engines?
Yes. High temperatures increase engine operating temperatures and make regular maintenance more important throughout West Tennessee.
Keep Your Lawn Mower Ready for the Rest of Summer
Mid-summer maintenance is one of the simplest ways to keep your mower dependable during the busiest part of the growing season. Regular inspections and timely repairs help extend equipment life while improving mowing performance throughout West Tennessee.
Keep Your Equipment Running Strong All Season Long
Our experienced team is ready to help keep your lawn mower performing at its best through the hottest months of the year.
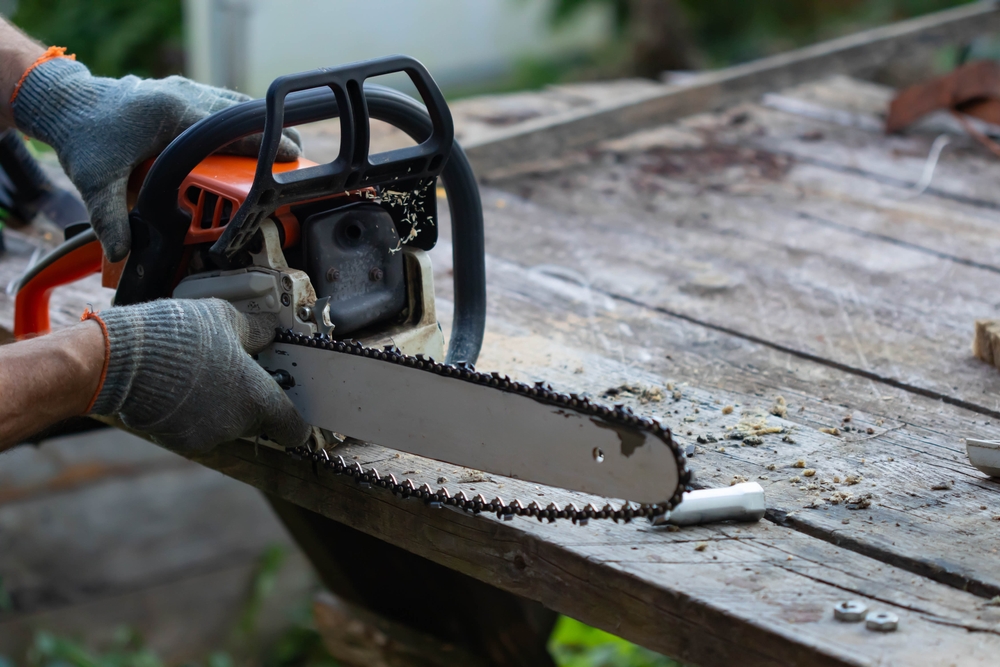
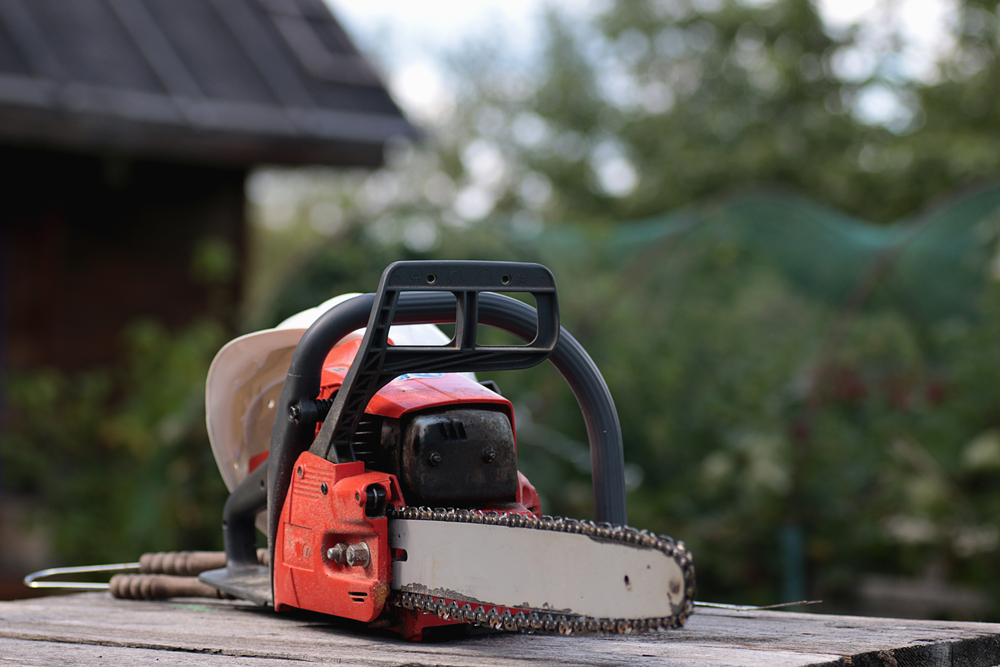
Whether you’re clearing storm damage, cutting firewood, or preparing fence posts around Bells, TN, your chainsaw is only as effective as its chain. A dull chain can slow your work, increase fuel consumption, and create unnecessary safety risks. Recognizing the warning signs before starting a major project can save time, money, and frustration.
Quick Answer
A chainsaw chain usually needs sharpening when it cuts slowly, produces fine sawdust instead of wood chips, pulls to one side, requires extra pressure to cut, or creates excessive vibration. Catching these signs early helps your chainsaw perform safely and efficiently, especially during busy cutting seasons in Crockett County and surrounding West Tennessee communities.
What Local Readers Should Know
A sharp chain cuts efficiently and safely, reducing strain on both the operator and the saw.
Sandy soil, storm debris, and hidden rocks around Bells can dull a chain faster than many people expect.
Spring storm cleanup and fall firewood season often lead to the highest demand for chainsaw maintenance in West Tennessee.
Regular sharpening extends chain life and helps prevent unnecessary wear on the guide bar and engine.
Inspecting your chain before every major cutting job can prevent delays once work begins.
Why This Matters Locally
A dull chainsaw chain is more than an inconvenience. Throughout Bells, Alamo, Friendship, Gadsden, and other nearby communities in Crockett County, many property owners rely on chainsaws for maintaining wooded lots, cleaning up after severe weather, and preparing firewood before colder months.
Hill’s Repair Shop understands that dependable equipment matters when there’s work to be done. We help local homeowners, landowners, and outdoor professionals keep their chainsaws operating at their best so projects stay on schedule.
Local Data or Field Observations
While chain wear depends on how and where a saw is used, one consistent field observation is that chains dull much faster after cutting dirty wood or logs that have contacted the ground. West Tennessee’s seasonal storms can leave fallen trees coated with mud, grit, and debris that quickly wear cutting teeth. Operators who frequently clear fence lines or wooded property often require sharpening more often than those cutting clean, seasoned firewood.
Local Impact
A dull chain affects more than cutting speed. It places additional stress on the engine, clutch, guide bar, and drive components. Property owners around Bells often have limited weekends available for outdoor projects, so unexpected equipment issues can delay work that depends on favorable weather.
For commercial users, landscapers, farmers, and tree service professionals, downtime can also mean missed appointments and reduced productivity.
5 Signs Your Chainsaw Chain Needs Sharpening
1. The Saw Produces Fine Sawdust Instead of Wood Chips
A sharp chain creates coarse, square-shaped wood chips. When the chain begins producing fine sawdust, the cutters are no longer slicing efficiently.
This is usually one of the earliest signs that sharpening is needed.
2. You Have to Push the Saw Through the Cut
A properly sharpened chain feeds itself into the wood with minimal pressure.
If you’re forcing the saw through logs or limbs, the cutters have likely become dull. Applying extra force not only increases fatigue but also raises the chance of kickback.
3. The Chainsaw Pulls to One Side
If your chainsaw consistently curves during a cut, uneven cutter wear may be the cause.
This often happens when one side of the chain becomes dull faster than the other or has been sharpened unevenly.
4. Excessive Smoke Appears During Cutting
Smoke isn’t always caused by engine problems.
A dull chain creates more friction against the wood, generating unnecessary heat. If your chain is properly lubricated but still produces smoke, sharpening should be one of the first things you check.
5. Increased Vibration and Rough Operation
A sharp chain cuts smoothly with relatively little vibration.
When cutters lose their edge, the chain tends to bounce and chatter across the wood instead of cutting cleanly. This makes the saw less comfortable to operate and can accelerate wear on other components.
When to Call a Professional
A chainsaw owner can safely monitor chain sharpness, chain tension, lubrication, and visible damage before each use.
Professional service becomes worthwhile if:
The chain has struck rocks, nails, or metal.
Multiple cutters are chipped or damaged.
The chain cuts unevenly after sharpening.
The guide bar shows excessive wear.
You’re unsure whether the chain can be safely restored.
Professional sharpening also helps maintain proper cutting angles that can be difficult to achieve consistently by hand.
Common Local Causes of Dull Chains
Several local conditions contribute to faster chain wear around Bells and nearby communities.
Storm cleanup often introduces dirt, sand, and hidden debris.
Fence row clearing frequently exposes chains to rocks and old wire.
Ground contact while bucking fallen trees dulls cutters almost immediately.
Cutting dirty firewood increases abrasive wear.
Long periods between maintenance allow minor dullness to become severe.
Prevention and Maintenance
Preventive maintenance is far easier than repairing damaged equipment.
Helpful practices include:
Inspect the chain before every major job.
Keep chain tension properly adjusted.
Maintain adequate bar and chain oil levels.
Avoid cutting directly into the ground.
Clean debris from the saw after each use.
Sharpen at the first signs of reduced performance instead of waiting for severe dullness.
Many local property owners schedule maintenance before spring cleanup and again before fall firewood season.
Expected Results
A properly sharpened chain typically delivers:
Faster cutting performance.
Cleaner, straighter cuts.
Reduced operator fatigue.
Less engine strain.
Longer guide bar and chain life.
Improved overall safety during operation.
Results vary depending on chain condition, saw maintenance, and cutting conditions.
Common Mistakes
Mistake: Waiting until the chain barely cuts.
Consequence: Increased wear on the saw and more difficult operation.
Better Approach: Sharpen at the first noticeable decline in cutting performance.
Mistake: Applying excessive pressure.
Consequence: Higher fatigue and increased kickback risk.
Better Approach: Let a properly sharpened chain do the work.
Mistake: Continuing to cut after striking the ground.
Consequence: Rapid cutter damage.
Better Approach: Stop and inspect the chain before continuing.
Common Local Scenario
A common situation around Bells occurs after a windstorm when fallen trees must be removed quickly. A homeowner begins cutting with a chain that performed adequately during the previous season. After several difficult cuts producing only sawdust, progress slows dramatically. A professional sharpening restores cutting efficiency, allowing the cleanup to continue safely without unnecessary strain on the equipment.
Related Service Solutions
Chainsaw performance depends on more than just a sharp chain. Related maintenance services often include:
We proudly serve customers in Bells, Alamo, Friendship, Gadsden, Crockett County, and nearby West Tennessee communities. Whether you’re maintaining a small residential property or managing larger acreage, we’re here to help keep your equipment ready for the job.
Cost of Ignoring the Issue
Continuing to operate with a dull chain can increase fuel use, reduce productivity, wear out expensive components, and create additional safety hazards. Addressing sharpening needs early is usually less expensive than repairing damage caused by prolonged operation.
How often should I sharpen my chainsaw chain in Bells, TN?
The answer depends on use, but many local property owners sharpen whenever cutting performance noticeably declines or after contacting dirt, rocks, or hidden debris common around rural properties.
Can a dull chain damage my chainsaw?
Yes. A dull chain forces the engine and cutting components to work harder, increasing wear over time.
Why is my chainsaw making sawdust instead of wood chips?
Fine sawdust is one of the clearest signs that the cutting teeth have become dull and need sharpening.
Does cutting storm-damaged trees dull chains faster around Crockett County?
Yes. Fallen trees often contain mud, sand, and embedded debris that quickly wear cutting edges.
Can I sharpen my own chain?
Yes. Many owners perform routine sharpening with the proper tools, although damaged or uneven chains often benefit from professional service.
Should I replace the chain instead of sharpening it?
A chain can often be sharpened several times. Replacement becomes appropriate when cutters become excessively worn, damaged, or reach their service limit.
Is chain sharpening worth it before a large cutting project?
Yes. Starting with a sharp chain improves efficiency, reduces fatigue, and lowers unnecessary wear on your saw.
What maintenance should I perform before firewood season in West Tennessee?
Inspect the chain, guide bar, lubrication system, air filter, spark plug, and chain tension before beginning heavy seasonal use.
Keep Your Chainsaw Ready for the Next Job
Routine sharpening is one of the simplest ways to improve chainsaw performance and extend equipment life. Staying ahead of maintenance helps you work more efficiently while reducing unnecessary wear on your saw.
Get Your Chainsaw Ready Before You Cut
Whether you’re preparing for storm cleanup, firewood season, or your next outdoor project in Bells and the surrounding area, we’re ready to help keep your equipment performing its best.
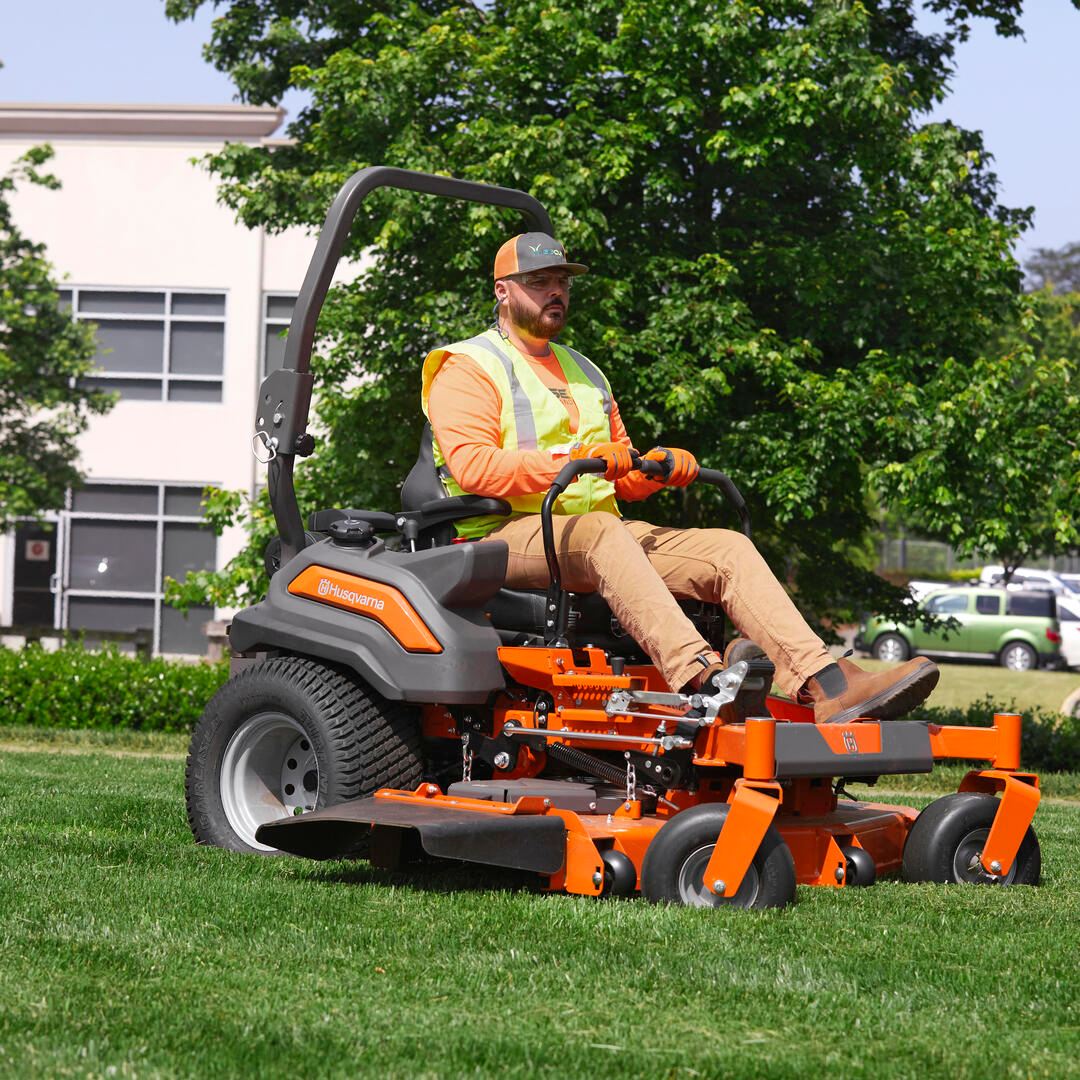
If you’ve only got Saturday to mow and your zero-turn mower suddenly starts leaving streaks across the yard, you’re not alone. West Tennessee’s heat and humidity can make grass grow fast, and a mower that isn’t cutting evenly can quickly turn a simple weekend chore into an all-day frustration.
Whether you own a few acres outside Bells, maintain a property near Alamo, or run a lawn care business serving Brownsville and Crockett County, identifying the cause early can save time, money, and unnecessary wear on your equipment.
Quick Answer
An uneven lawn mower cut is most commonly caused by uneven tire pressure, dull or bent blades, a mower deck that’s out of level, or worn suspension and spindle components. Many of these issues can be checked at home in just a few minutes. If the problem continues after basic maintenance, a professional inspection can help prevent more expensive repairs and get your mower ready before another weekend of fast-growing grass.
What Local Readers Should Know
West Tennessee’s combination of frequent rain and high summer humidity causes lawns to grow quickly, making consistent mower performance especially important.
Even a small difference in tire pressure can noticeably affect cut height on a zero-turn mower.
Multi-acre properties throughout Crockett County often put more hours on mowing equipment, increasing normal wear on blades, belts, and deck components.
Commercial landscapers around Bells, Alamo, and Brownsville can reduce costly downtime by addressing uneven cutting before it becomes a larger mechanical issue.
Regular inspections throughout mowing season are easier and less expensive than waiting until a breakdown interrupts your schedule.
Why This Matters Locally
An uneven cut isn’t just about appearance. During peak growing season in Bells, lawns can become overgrown in only a few days after a stretch of warm temperatures and afternoon storms. Missing a weekend of mowing often means spending twice as long catching up the following week.
At Hill’s Repair Shop, we understand how valuable your weekends are. We believe homeowners, acreage owners, hobby farmers, and local lawn care professionals deserve straightforward advice before jumping straight into repairs. A few quick checks may solve the problem. If not, we’re here to help get your mower back to work quickly.
Local Field Observations
Based on what we commonly see in the Bells area, uneven cutting tends to become more frequent during the busiest part of mowing season. Fast-growing grass puts extra strain on blades and belts, while rough terrain, hidden roots, and occasional rocks can bend blades or knock decks slightly out of alignment.
Properties with several acres naturally accumulate more mowing hours each season, making preventative maintenance especially valuable before small problems become larger repairs.
Local Impact
An uneven lawn mower cut creates more than cosmetic problems.
For homeowners, it often means making another pass across the yard, using more fuel, and spending more time outside in West Tennessee’s summer heat.
For commercial lawn care operators, poor cut quality can affect customer satisfaction and delay multiple scheduled jobs throughout the day.
For acreage owners, repeated mowing with damaged components may place additional stress on the mower deck, spindle assemblies, and drive system.
Warning Signs Your Zero-Turn Needs Attention
A zero-turn mower often gives warning signs before a major repair is needed.
The mower leaves strips of taller grass after every pass.
One side consistently cuts lower than the other.
Grass appears torn instead of cleanly cut.
The mower vibrates more than normal while operating.
You hear unusual noises coming from the mower deck.
The steering or ride feels different than usual.
The mower scalps certain areas that previously cut evenly.
Common Causes of an Uneven Lawn Mower Cut
1. Uneven Tire Pressure
The simplest problem is often the correct one.
Zero-turn mowers rely on properly inflated tires to maintain deck height. Even a few pounds of pressure difference between tires can noticeably change how the blades contact the grass.
Always check tire pressure before adjusting the mower deck.
2. Dull or Bent Blades
Sharp blades produce a clean, even cut.
Striking rocks, tree roots, hidden branches, or other obstacles common on rural properties around Crockett County can bend a blade or damage its cutting edge.
If one blade is damaged, replacing or servicing both blades together generally provides the most consistent cutting performance.
3. An Unlevel Mower Deck
A mower deck should sit at the manufacturer’s recommended height and pitch.
Over time, vibration, normal wear, and occasional impacts can gradually move adjustment points out of specification.
A deck that’s only slightly out of level may still leave visible streaks across the lawn.
4. Worn Spindles or Bearings
Blade spindles allow blades to rotate smoothly.
When bearings begin wearing out, blades may wobble during operation, producing an inconsistent cut while also creating vibration.
Ignoring this issue can eventually damage additional mower components.
5. Worn Belts
A stretched or slipping deck belt may prevent blades from maintaining full speed.
Lower blade speed often results in ragged grass tips and inconsistent cutting, especially in thicker summer grass.
When to Call a Professional
Many basic maintenance items are safe for homeowners to inspect.
You can generally:
Check tire pressure.
Inspect blades for visible damage.
Remove built-up grass from beneath the deck after disconnecting the spark plug and following manufacturer safety procedures.
Verify obvious loose hardware.
Professional service is recommended if:
The mower continues cutting unevenly after these checks.
The deck requires precise leveling.
Spindles, bearings, belts, or pulleys appear worn.
You notice excessive vibration.
The mower strikes a large obstacle and immediately begins cutting poorly.
Professional diagnosis can often identify several small issues during one inspection, helping prevent future downtime.
Prevention and Maintenance
Preventative maintenance is usually less expensive than repairing avoidable damage.
Good seasonal habits include:
Check tire pressure before each mowing session.
Sharpen or replace blades as recommended by your mower manufacturer.
Clean accumulated grass from underneath the deck regularly.
Inspect belts for cracking or excessive wear.
Listen for unusual noises before they become major failures.
Schedule seasonal lawn mower service in Crockett County before peak mowing season begins.
Expected Results After Proper Service
Once underlying issues are corrected, most owners notice immediate improvements.
A properly serviced zero-turn should:
Produce an even, consistent cut.
Leave cleaner grass tips.
Reduce vibration.
Improve mowing efficiency.
Require fewer repeat passes across the yard.
Help extend the life of major mower components.
Common Mistakes to Avoid
Mistake: Adjusting the mower deck before checking tire pressure.
Consequence: The deck may still be uneven after adjustment.
Better approach: Verify tire pressure first, then measure deck height.
Mistake: Continuing to mow with bent blades.
Consequence: Additional vibration may damage spindles or bearings.
Better approach: Replace damaged blades promptly.
Mistake: Ignoring unusual vibration.
Consequence: Small repairs may develop into more expensive mechanical problems.
Better approach: Have the mower inspected before the issue worsens.
A Common Local Scenario
A homeowner with several acres outside Bells notices stripes of taller grass after mowing. Tire pressure checks reveal one front tire is several pounds lower than the other. After correcting the pressure, the mower cuts more evenly, but a slight vibration remains. A professional inspection later identifies a partially bent blade that likely resulted from striking a hidden root earlier in the season. Addressing both issues restores clean, even mowing before another busy weekend.
Related Service Solutions
If DIY troubleshooting doesn’t solve the problem, professional service can help identify issues that aren’t easily visible.
Services that commonly address uneven cutting include:
We’re proud to serve homeowners, acreage owners, and commercial mowing professionals throughout Bells, Alamo, Brownsville, Crockett County, and nearby West Tennessee communities. Whether your mower handles a residential lawn or multiple commercial properties, we’re here to help keep it performing at its best.
The Cost of Waiting
Putting off repairs can lead to more than an unattractive lawn.
Continuing to mow with damaged blades, worn bearings, or an improperly adjusted deck may increase wear on other components, reduce mowing efficiency, and create additional repair costs later in the season. Addressing problems early helps keep your equipment ready when the grass starts growing fast.
Why is my zero-turn mower leaving strips of uncut grass in Bells?
The most common reason is uneven blade height, dull blades, or low tire pressure. Because lawns in Bells often grow quickly during summer, these small issues become much more noticeable.
How often should I sharpen my mower blades in Crockett County?
The answer depends on usage, but properties with heavy mowing schedules or rough terrain often require more frequent blade maintenance than smaller residential lawns.
Can uneven tire pressure really affect cut quality?
Yes. Even small differences in tire pressure can change deck height enough to create an uneven lawn mower cut.
Should I replace both blades if only one is bent?
Yes. Replacing or servicing both blades together generally provides more balanced performance and a more consistent cut.
When should I schedule lawn mower service in Crockett County?
The best time is before peak summer mowing begins or as soon as you notice changes in cut quality, vibration, or unusual noises.
Do commercial landscapers benefit from preventative maintenance?
Yes. Preventative maintenance helps reduce unexpected downtime, allowing commercial mowing crews to stay on schedule during the busiest part of the season.
Keep Your Weekends Focused on Your Yard, Not Your Repairs
A few simple checks can often solve uneven cutting, but some problems require experienced diagnosis. Whether you maintain one yard or several acres, addressing small issues early helps keep your mower reliable throughout West Tennessee’s busiest mowing season.
Get Back to a Clean, Even Cut
Our goal is to help you spend less time troubleshooting and more time enjoying a mower that performs the way it should.
If your chainsaw starts losing power halfway through a cut, stalls under load, or refuses to reach full RPM, a clogged spark arrestor could be the culprit. For tree service professionals, firewood cutters, and rural landowners across Bells, Alamo, Brownsville, and Crockett County, downtime means lost productivity, especially during storm cleanup or busy cutting seasons.
Quick Answer
A clogged spark arrestor restricts exhaust flow, making your chainsaw run poorly, lose power under load, and struggle to maintain cutting performance. Cleaning or replacing the spark arrestor often restores performance, but excessive carbon buildup can also indicate underlying engine or fuel system issues that deserve professional attention.
What Local Readers Should Know
A chainsaw losing power under load is often caused by restricted exhaust, not just a dull chain or bad fuel.
Heavy cutting of hardwood common throughout Crockett County can increase carbon buildup over time.
Storm cleanup after severe West Tennessee weather places extra demand on professional-grade chainsaws.
Regular inspection of the spark arrestor helps reduce unexpected downtime for arborists, landowners, and firewood cutters.
Professional chainsaw repair in Bells TN can identify whether the spark arrestor is the only problem or part of a larger engine issue.
Why This Matters Locally
A clogged spark arrestor can quickly become a major problem for anyone relying on outdoor power equipment across West Tennessee. Whether you’re clearing fence lines outside Bells, processing firewood near Alamo, or handling storm damage around Brownsville, your saw needs to deliver consistent power.
Hill’s Repair Shop understands how valuable dependable equipment is during the busiest times of year. We work with local property owners, logging professionals, and commercial tree crews who depend on reliable performance every day.
Local Field Observations
Based on common service observations, carbon buildup tends to become more noticeable after extended periods of heavy cutting, especially when equipment is operated for long hours without routine maintenance. Chainsaws used by tree service companies, logging operations, and storm cleanup crews often accumulate debris faster simply because of the demanding workloads they handle.
Local Impact
For homeowners, reduced chainsaw performance means projects take longer and become more physically demanding.
For commercial crews, every minute spent troubleshooting equipment affects productivity. Tree care businesses working throughout Bells, Alamo, Brownsville, and surrounding communities often operate on tight schedules. Equipment that cannot maintain peak RPM slows the entire crew and may delay job completion.
Warning Signs of a Clogged Spark Arrestor
A clogged spark arrestor usually develops gradually before becoming severe enough to stop work altogether.
Common warning signs include:
Your chainsaw loses power while cutting thicker logs.
The engine struggles to reach full throttle.
Acceleration feels sluggish.
The saw idles normally but bogs down during heavy cuts.
Fuel consumption seems higher than normal.
Excessive carbon deposits are visible around the muffler.
The engine stalls even though fresh fuel and a clean air filter are installed.
These symptoms can resemble carburetor or ignition problems, which is why proper diagnosis is important.
When to Call a Professional
If cleaning the spark arrestor does not restore performance, it’s time for a more complete inspection.
Professional service becomes worthwhile when:
The chainsaw continues losing power under load.
The spark arrestor repeatedly clogs after cleaning.
Engine performance continues to decline.
The muffler or exhaust components appear damaged.
Carburetor adjustment or engine tuning may be required.
An experienced technician can determine whether restricted exhaust is the root cause or whether additional repairs are needed.
Common Local Causes
Several conditions contribute to spark arrestor buildup in West Tennessee.
Heavy Continuous Cutting
Professional arborists and firewood cutters often run chainsaws for extended periods, allowing carbon deposits to accumulate faster than occasional residential use.
Poor Fuel Quality
Old gasoline or improper fuel mixtures can increase carbon formation inside the exhaust system.
Long Idle Times
Storm cleanup crews sometimes spend significant time idling equipment between cuts, contributing to incomplete combustion and additional deposits.
Deferred Maintenance
Busy cutting seasons make it easy to postpone preventive maintenance until performance noticeably declines.
Prevention and Maintenance
Preventing spark arrestor problems is much easier than dealing with unexpected downtime.
Helpful maintenance practices include:
Inspect the spark arrestor during routine service intervals.
Use fresh fuel mixed according to manufacturer recommendations.
Replace worn spark plugs as needed.
Clean the air filter regularly.
Avoid storing fuel for long periods.
Schedule seasonal inspections before storm season or heavy firewood cutting begins.
Routine maintenance helps professional equipment stay productive throughout demanding workloads.
Expected Results
If the spark arrestor is the primary issue, cleaning or replacing it can restore normal exhaust flow and improve engine performance.
However, if carbon buildup has developed alongside carburetor issues, ignition problems, or engine wear, additional repairs may be necessary before full power returns.
A complete inspection provides the clearest picture of what your equipment needs.
Common Mistakes
Mistake: Replacing Parts Without Diagnosing the Problem
Consequence: Money gets spent replacing spark plugs, carburetors, or fuel lines that were not causing the issue.
Better Approach: Begin with a complete inspection that evaluates the exhaust, ignition, fuel delivery, and air intake systems together.
Mistake: Continuing to Operate a Bogging Chainsaw
Consequence: Reduced productivity, increased fuel consumption, and additional engine wear.
Better Approach: Address power loss early before more expensive repairs become necessary.
Mistake: Ignoring Routine Maintenance
Consequence: Carbon buildup gradually reduces performance until equipment becomes unreliable during important jobs.
Better Approach: Include spark arrestor inspection as part of regular chainsaw maintenance.
Common Local Scenario
A tree service crew finishes several days of heavy storm cleanup around Crockett County and notices one professional saw struggling during larger cuts. The chain remains sharp, fresh fuel has been added, and the air filter is clean. Inspection reveals a heavily carbon-coated spark arrestor restricting exhaust flow. After servicing the exhaust system and confirming proper engine operation, the saw returns to normal cutting performance.
Related Service Solutions
A clogged spark arrestor is only one possible cause of poor chainsaw performance.
Other related services may include:
Complete chainsaw diagnostics
Carburetor adjustment
Fuel system inspection
Ignition system testing
Muffler repair
Routine logging equipment service in Crockett County
Preventive maintenance for commercial outdoor power equipment
Ideal for commercial operators and heavily used equipment.
Service Areas
We proudly serve customers throughout Bells, Alamo, Brownsville, Crockett County, and surrounding areas across West Tennessee. Whether you’re maintaining residential equipment or keeping an entire commercial fleet running, dependable service helps reduce downtime.
Cost of Ignoring the Issue
Ignoring a clogged spark arrestor rarely makes the problem disappear.
Reduced engine performance can increase fuel consumption, slow production, place additional strain on engine components, and eventually lead to more costly repairs. For commercial operators, lost productivity often costs more than preventive maintenance.
Can a clogged spark arrestor really cause a chainsaw to lose power under load?
Yes. A clogged spark arrestor restricts exhaust flow, making it difficult for the engine to breathe properly. The result is often a chainsaw losing power under load, sluggish acceleration, and reduced cutting performance.
How often should chainsaw owners in Bells inspect the spark arrestor?
The answer depends on how frequently the saw is used. Professional operators in Bells may inspect it regularly during busy seasons, while occasional homeowners can typically include it as part of routine annual maintenance.
Does heavy hardwood cutting in Crockett County affect spark arrestor buildup?
Yes. Frequent heavy cutting increases engine operating time, which can accelerate carbon accumulation inside the exhaust system, especially on professional-grade equipment.
Can I clean a spark arrestor myself?
Yes. Many spark arrestors can be removed and cleaned carefully according to the manufacturer’s recommendations. If performance does not improve afterward, additional diagnosis is recommended.
Should storm cleanup crews service chainsaws before severe weather season?
Yes. Preparing equipment before severe weather arrives helps reduce unexpected failures when dependable performance matters most.
What else causes a chainsaw to lose power besides a clogged spark arrestor?
Other common causes include carburetor problems, fuel delivery issues, dirty air filters, ignition faults, worn engine components, or improper fuel mixtures. A complete inspection can identify the exact cause.
Is professional chainsaw repair in Bells TN worth it for commercial equipment?
Yes. Commercial operators often benefit from professional diagnosis because minimizing downtime helps crews stay productive and avoid larger repair costs.
Does regular logging equipment service in Crockett County help prevent these issues?
Yes. Routine inspections help identify developing problems before they affect performance, making preventive maintenance one of the best ways to extend equipment reliability.
Keep Your Chainsaw Ready for the Next Job
Reliable equipment keeps projects moving, whether you’re clearing storm damage, managing timber, or cutting firewood. Regular maintenance and timely repairs help prevent small exhaust problems from turning into major downtime.
Get Your Equipment Running Strong Again
We help homeowners, landowners, arborists, and commercial crews keep their outdoor power equipment performing at its best. Contact us today to schedule your chainsaw inspection or repair.
Summer in West Tennessee is something else entirely. The heat rolls in early, the humidity wraps around you like a wet blanket, and the grass, well, it does not wait for anyone. If you live in or around Bells, TN, you already know that keeping your lawn in shape during the summer months takes more than a little weekend effort. It takes the right outdoor power equipment, the right technique, and a solid understanding of what your yard actually needs.
Whether you are a homeowner trying to keep up with the neighbors or a lawn care professional managing multiple properties, having the best summer lawn tools is not a luxury. It is a necessity.
Why West Tennessee Lawns Demand the Best Equipment
The climate in West Tennessee is not forgiving. Summers bring intense heat, frequent afternoon thunderstorms, and rapid grass growth that can turn a tidy yard into a jungle within a matter of days. Warm-season grasses like Bermuda, Zoysia, and Centipede are common throughout the region, and they thrive in the heat, which means they also grow aggressively when conditions are right.
This growth pattern puts pressure on your equipment. A standard residential mower that works fine in a milder climate may struggle to keep up with the demands of a West Tennessee summer. That is why lawn care tips specific to this region almost always circle back to one central theme: invest in quality outdoor power equipment that can handle the heat, the terrain, and the volume of work that comes with the season.
Homeowners in Bells, TN and the surrounding communities benefit from working with local dealers who understand these conditions and can help match the right tools to the right property. From large open yards to tighter residential lots with landscaping features, there is no one-size-fits-all solution, but there are tools that consistently rise to the top.
Zero-Turn Mowers: The Gold Standard for Summer Mowing
If there is one piece of equipment that defines efficient summer lawn care in West Tennessee, it is the zero-turn mower. Known for their speed, precision, and maneuverability, these machines have become the preferred choice for both homeowners with larger lots and professional lawn care crews alike.
Zero-turn mowers for sale at reputable local dealers come in a wide range of configurations, from entry-level residential models to heavy-duty commercial units built for hours of continuous use. The defining feature is the ability to turn within the machine’s own footprint, which eliminates the need for multiple passes around obstacles and dramatically reduces the time it takes to mow a property.
For a yard in Bells, TN with trees, flower beds, fence lines, and other features, a zero-turn mower offers a level of precision that a standard riding mower simply cannot match. The faster cutting speeds also mean you are spending less time in the summer heat, which is a benefit that anyone who has mowed in July in West Tennessee will deeply appreciate.
When shopping for zero-turn mowers for sale, pay close attention to engine displacement, deck size, and fuel capacity. A larger deck covers more ground per pass, but it needs to be matched to the size and layout of your property. Talking with a knowledgeable dealer in the area can make the difference between a purchase that serves you well for years and one that leaves you frustrated by the end of the first season.
High-Performance String Trimmers: The Detail Work That Makes a Difference
A great mowing job is only as good as the edging and trimming that finishes it off. High-performance string trimmers are essential for getting into the spots your mower cannot reach, including along fences, around trees, beside driveways, and near garden beds. In West Tennessee, where warm-season grasses spread aggressively, a string trimmer is not just a finishing tool. It is a frontline defense against overgrowth.
The market for high-performance string trimmers has evolved significantly in recent years. Gas-powered models still dominate in professional settings because of their power and runtime, but battery-powered options have closed the gap considerably. For homeowners in Bells, TN managing a standard residential lot, a high-quality battery-powered trimmer can handle the job without the maintenance demands of a gas engine.
When choosing a string trimmer, look for features like adjustable shaft length, a comfortable harness option for extended use, and compatibility with the trimmer line diameter you prefer. Heavier line handles thicker grass and brush, while lighter line is better suited for fine edging work. In a climate like West Tennessee’s, where grass can get thick and tough by midsummer, erring on the side of a more powerful unit is usually the right call.
Lawn care tips from experienced operators in the region often emphasize keeping a trimmer properly loaded with fresh line and checking the cutting head regularly. Running out of line mid-job or dealing with a clogged head in the middle of summer is an avoidable frustration with a little routine attention.
Hedge Trimmer Maintenance: Keeping Your Shrubbery Sharp All Season
Hedges and ornamental shrubs add real visual value to a West Tennessee property, but they require consistent attention to stay looking their best. A hedge trimmer is one of those tools that many homeowners underestimate until they need it, and by then, the shrubs have often gotten out of hand.
Hedge trimmer maintenance is not complicated, but it does require consistency. Blades should be cleaned after each use to remove sap and debris, which can corrode the metal and reduce cutting efficiency over time. A light coating of blade oil after cleaning goes a long way toward extending the life of the tool.
Sharpening the blades at least once per season, or more frequently with heavy use, is also a critical part of hedge trimmer maintenance. Dull blades tear rather than cut, which damages the plant tissue and makes the shrubs more susceptible to disease and stress, a real concern in the heat of a West Tennessee summer.
For homeowners in Bells, TN who are not comfortable sharpening blades themselves, many outdoor power equipment dealers offer servicing and sharpening as part of their seasonal maintenance programs. Bringing your tools in before the peak of summer ensures they are ready to perform when you need them most.
Putting It All Together: Building a Complete Lawn Care Setup
The best summer lawn tools do not work in isolation. They work together as part of a complete system designed to handle every aspect of your lawn and landscape. A zero-turn mower handles the broad cuts. High-performance string trimmers handle the edges and tight spots. A well-maintained hedge trimmer keeps the structural elements of your landscape looking intentional and polished.
Beyond these core tools, homeowners in West Tennessee often round out their setups with a quality backpack blower for clearing clippings and debris, a walk-behind edger for crisp curb lines, and a dedicated sprayer for seasonal treatments. Each of these tools plays a supporting role, but together they create a lawn care routine that can handle everything the summer throws at you.
Local dealers near Bells, TN carry a wide selection of outdoor power equipment from trusted brands, and many offer financing options that make it easier to invest in the tools you actually need without stretching your budget all at once.
Conclusion
West Tennessee summers are demanding, but the right outdoor power equipment makes the job manageable. From zero-turn mowers for sale to high-performance string trimmers and proper hedge trimmer maintenance, building a solid tool kit is the foundation of great lawn care tips and results. If you are in or near Bells, TN, connect with a local dealer who understands the region and can help you find the best summer lawn tools for your property.